How to Create an Amazon Storefront as an Influencer: Your Complete Setup Guide
Creating a professional Amazon storefront is one of the most crucial steps in your influencer journey. Your storefront serves as your digital headquarters on Amazon, where followers can discover all your product recommendations in one organized, shoppable location. In this comprehensive guide, I’ll walk you through every step of building a storefront that converts browsers into buyers and maximizes your commission potential.
What is an Amazon Influencer Storefront?
An Amazon influencer storefront is your personalized shopping destination on Amazon’s platform. Think of it as your own mini-store within the Amazon ecosystem, complete with:
- Custom URL (amazon.com/shop/yourhandle)
- Branded header and profile sections
- Curated product collections and lists
- Your shoppable videos and photos
- Direct links to all your recommended products
Unlike traditional affiliate links that take customers to individual product pages, your storefront keeps visitors engaged with your brand while they browse multiple recommendations.
Prerequisites: Getting Storefront Access
Before you can create your storefront, you need to:
- Get approved for the Amazon Influencer Program – This requires an engaged social media following on TikTok, Instagram, YouTube, or Facebook
- Complete your initial account setup – Provide tax information and payment details
- Have at least some content ready – While not required, having a few products in mind helps with initial setup
If you haven’t been approved yet, don’t worry! The application process is straightforward, and you can apply unlimited times.
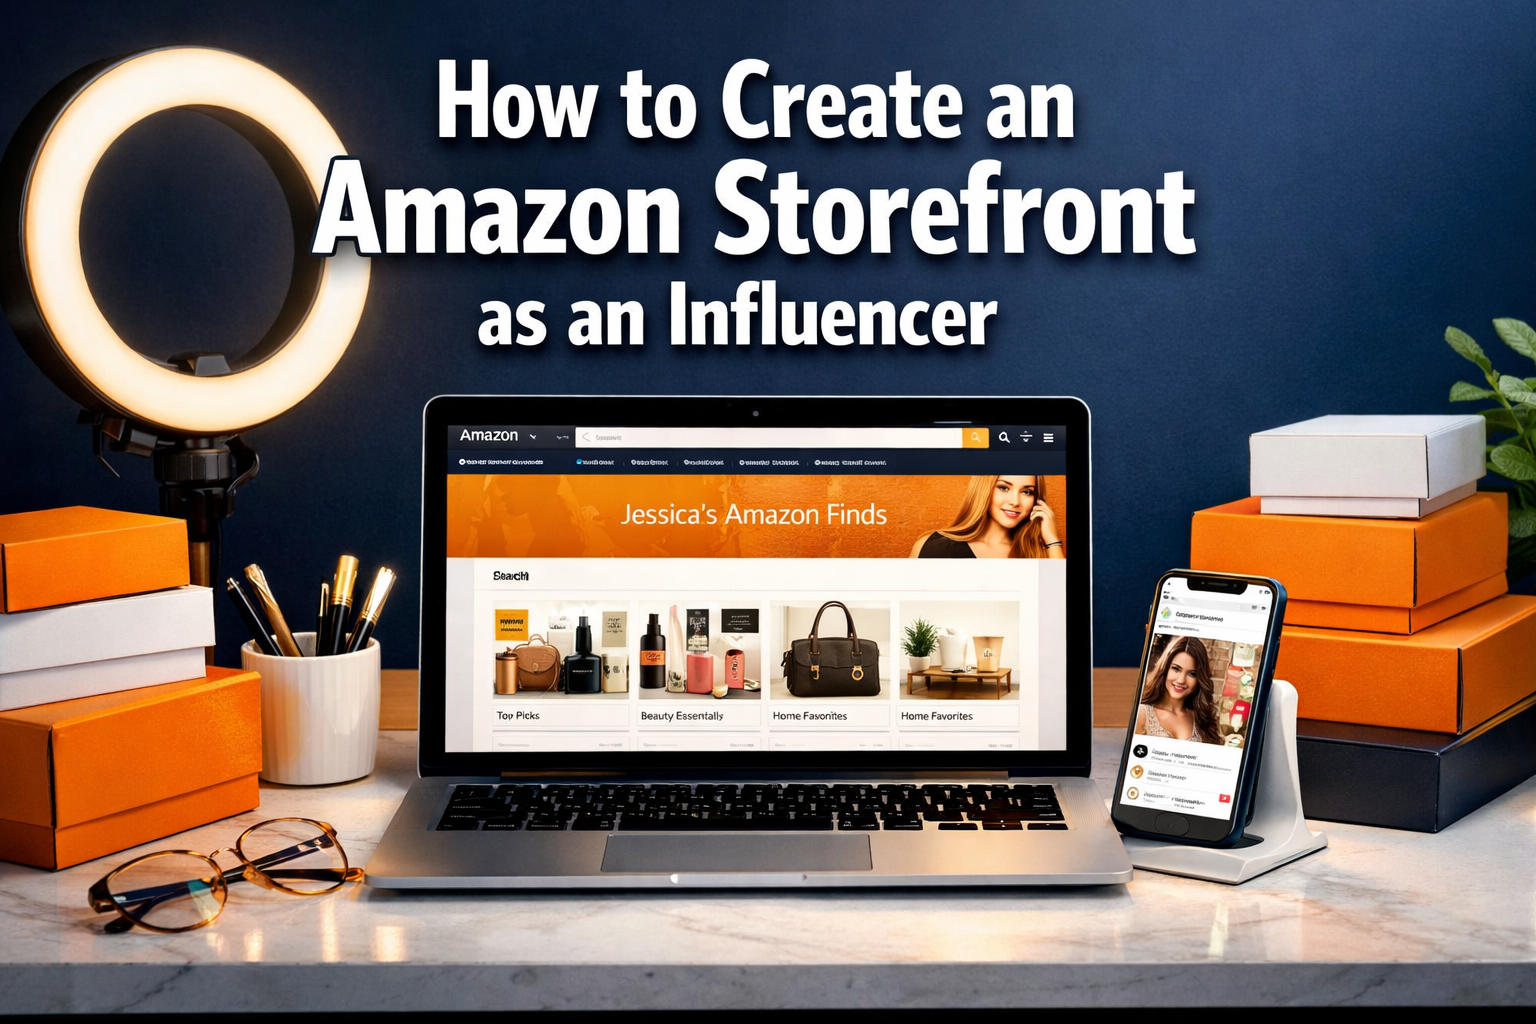
Step 1: Access Your Storefront Dashboard
Once approved for the Amazon Influencer Program:
- Log into your Amazon Associates account
- Navigate to the “Storefront” section in your dashboard
- Click “Manage Your Storefront” or “Get Started”
- You’ll be taken to your storefront builder interface
Your storefront will automatically be assigned a URL based on your social media handle, but you can customize this during setup.
Step 2: Design Your Storefront Header and Profile
Profile Photo Selection
Your profile photo is the first thing visitors see, so make it count:
- Use a high-quality headshot if you’re building a personal brand
- Choose your logo if you’re representing a business or brand
- Ensure it’s recognizable across your social media platforms
- Keep it professional but approachable
- Use consistent branding with your other social platforms
Creating Your Header Banner
Your header banner is prime real estate for establishing your brand:
Dimensions: 1200 x 300 pixels (Amazon’s recommended size)
Essential Elements to Include:
- Your name or brand name
- Your niche or specialty (e.g., “Home & Kitchen Essentials”)
- A compelling tagline or value proposition
- Consistent color scheme with your brand
- High-quality, eye-catching imagery
Design Tips:
- Keep text large enough to read on mobile devices
- Use contrasting colors for text and background
- Include your social media handles if space allows
- Avoid cluttered designs that distract from your message
Writing Your Bio
Your bio should be concise but compelling:
- Start with who you are and what you do
- Mention your expertise or why people should trust your recommendations
- Include your niche focus (home decor, tech, beauty, etc.)
- Add a call-to-action encouraging visitors to explore your recommendations
- Keep it under 200 characters for optimal display
Example Bio: “Home organization expert sharing my favorite finds for creating beautiful, functional spaces. Follow for daily home inspiration and honest product reviews! ✨”
Step 3: Set Up Your Social Media Links
Amazon allows you to link to your social media profiles directly from your storefront:
- Add all relevant platforms where you’re active
- Use consistent handles across platforms when possible
- Prioritize your most engaged platforms at the top
- Include your email for brand partnership inquiries
- Double-check all links work correctly
This cross-platform integration helps build your overall brand presence and gives visitors multiple ways to connect with you.
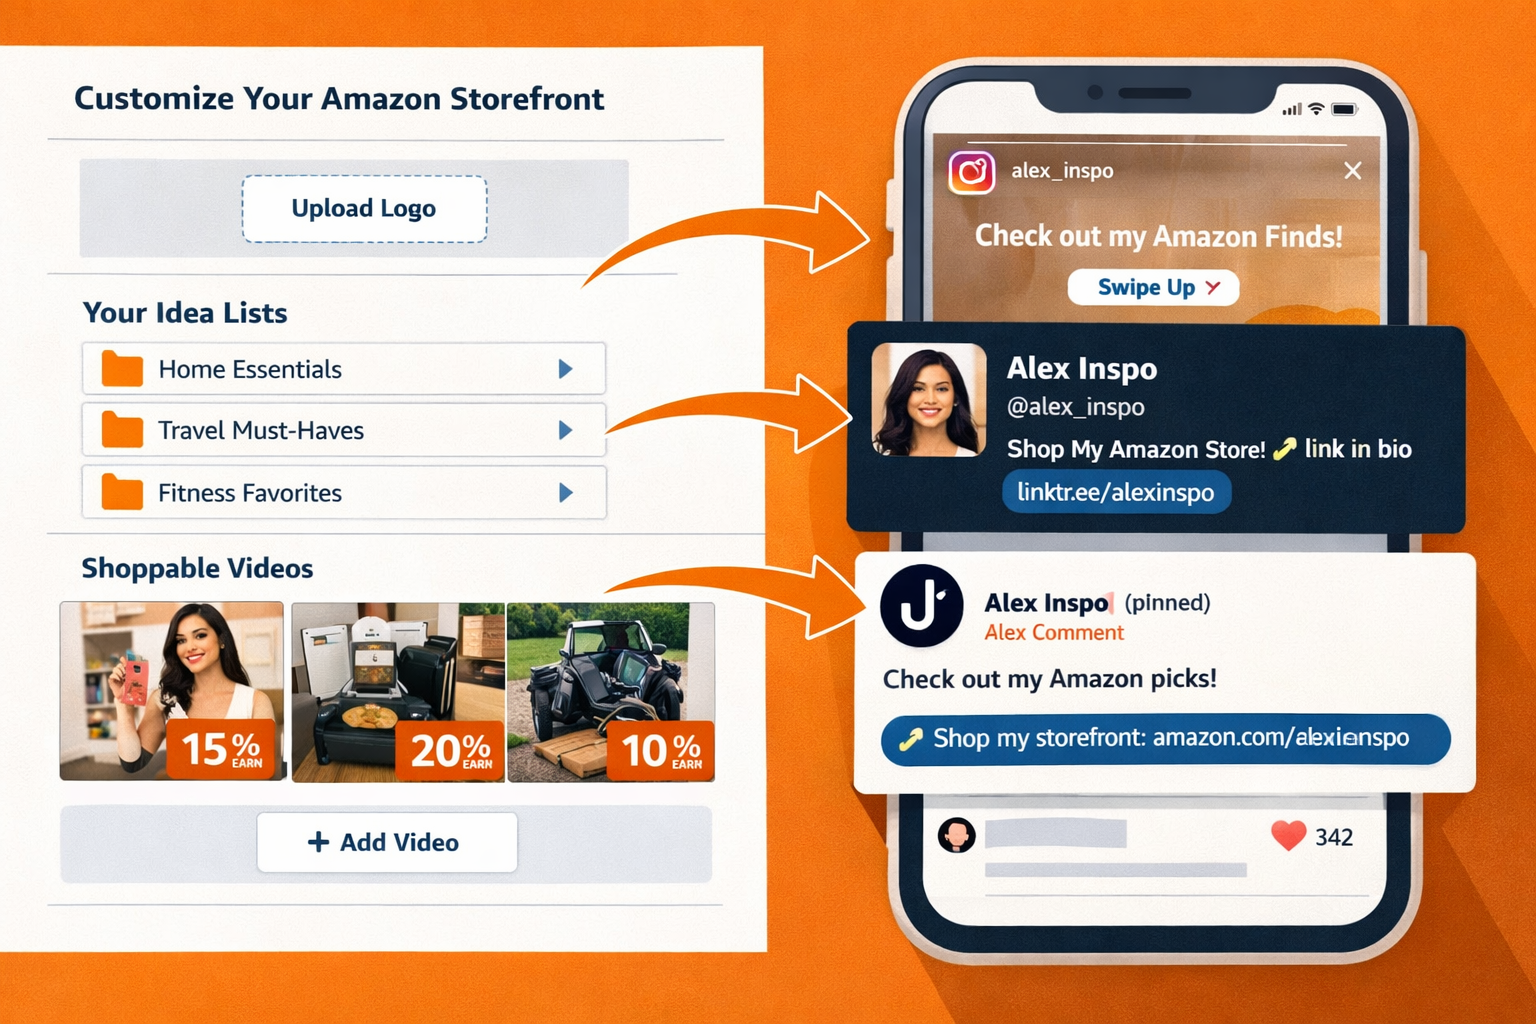
Step 4: Create Your First Product Lists
Product lists are the heart of your storefront. They organize your recommendations into logical, shoppable categories.
Types of Lists You Can Create
Idea Lists: Curated collections of products around specific themes
- “My Morning Routine Essentials”
- “Cozy Living Room Must-Haves”
- “Tech Gadgets I Can’t Live Without”
Seasonal Lists: Time-sensitive collections
- “Holiday Gift Guide”
- “Summer Outdoor Essentials”
- “Back-to-School Favorites”
Room-Based Lists: Organized by location
- “Kitchen Game-Changers”
- “Bedroom Sanctuary”
- “Home Office Setup”
Best Practices for List Creation
Naming Your Lists:
- Use descriptive, searchable titles
- Include keywords your audience would use
- Keep titles under 50 characters for mobile display
- Make them specific enough to set expectations
List Descriptions:
- Explain why you chose these products
- Share personal experiences or results
- Include relevant keywords naturally
- Keep descriptions engaging but concise (under 500 characters)
Product Selection Strategy:
- Start with 5-10 products per list
- Mix price points to appeal to different budgets
- Include products you genuinely use and love
- Focus on items with good reviews and ratings
- Consider commission rates when selecting products
Step 5: Add Products to Your Lists
Finding Products to Add
From Your Purchase History:
- Go to “Your Orders” in your Amazon account
- Search by room, category, or time period
- Look for items you still use and recommend
- Check if they’re still available and well-reviewed
Manual Product Search:
- Use Amazon’s search function within your storefront builder
- Search by product name, brand, or category
- Filter by customer ratings and reviews
- Check commission rates for each category
Using ASIN Numbers:
- Every Amazon product has a unique ASIN (Amazon Standard Identification Number)
- Found in the product details section of any listing
- Paste ASIN directly into your storefront builder for exact matches
Product Addition Process
- Click “Add Products” in your list builder
- Search or browse for your desired items
- Select products by clicking the “+” button
- Arrange products in logical order (price, popularity, or preference)
- Add personal notes explaining why you recommend each item
- Save your list and preview how it looks
Pro Tip: Add products you genuinely own and use. Authenticity shows in your recommendations and leads to better conversion rates.
Step 6: Upload and Organize Your Content
Adding Photos
Photo Requirements:
- High resolution (at least 1000 x 1000 pixels)
- Good lighting and clear product visibility
- Lifestyle shots showing products in use
- Multiple angles when helpful
Photo Organization Tips:
- Group photos by product category
- Use consistent styling and filters
- Include both product shots and lifestyle images
- Tag products accurately for easy shopping
Uploading Videos
Video Specifications:
- MP4 format
- Maximum 5GB file size
- Horizontal orientation preferred (though vertical works for Inspire)
- 1-3 minutes optimal length
Video Content Strategy:
- Show products in action
- Answer common customer questions
- Demonstrate key features and benefits
- Keep audio clear and engaging
- Include proper product tags
Step 7: Optimize Your Storefront for Conversions
Navigation and User Experience
Logical Organization:
- Group similar products together
- Use clear, descriptive category names
- Prioritize your best-performing lists at the top
- Make it easy to find specific types of products
Mobile Optimization:
- Preview your storefront on mobile devices
- Ensure text is readable on small screens
- Check that images load quickly
- Test all links and functionality
SEO and Discoverability
Keyword Integration:
- Use relevant keywords in list titles and descriptions
- Include terms your audience searches for
- Don’t keyword stuff – keep it natural
- Research popular search terms in your niche
Regular Updates:
- Add new products monthly
- Remove discontinued or poorly-performing items
- Update seasonal content regularly
- Refresh descriptions to keep content current
Step 8: Promote Your Storefront
Cross-Platform Promotion
Social Media Integration:
- Add your storefront link to all social media bios
- Create content showcasing your favorite lists
- Share behind-the-scenes content about your curation process
- Use Instagram Stories to highlight new additions
Content Marketing:
- Create “shop my [room/routine/favorites]” posts
- Film room tours featuring your recommended products
- Share before/after transformations using your picks
- Write blog posts about your product selection process
Email Marketing
Newsletter Integration:
- Include your storefront link in email signatures
- Create monthly “favorites” newsletters
- Share exclusive lists with email subscribers
- Send seasonal gift guides featuring your recommendations
Step 9: Track Performance and Analytics
Key Metrics to Monitor
Traffic Analytics:
- Storefront visits and page views
- Time spent on your storefront
- Most popular lists and products
- Traffic sources (social media, direct, etc.)
Conversion Metrics:
- Click-through rates on products
- Commission earned per list
- Best-performing product categories
- Seasonal trends in purchases
Content Performance:
- Video view duration and engagement
- Photo click-through rates
- List popularity and shares
- Customer feedback and reviews
Using Data to Improve
Monthly Reviews:
- Analyze which lists generate the most revenue
- Identify top-performing products and create similar content
- Remove or update underperforming lists
- Adjust your content strategy based on what works
A/B Testing:
- Try different list titles and descriptions
- Test various product arrangements
- Experiment with different photo styles
- Compare performance of different content types
Advanced Storefront Strategies
Seasonal Optimization
Holiday Preparation:
- Create gift guides 2-3 months in advance
- Update existing lists with seasonal items
- Prepare holiday-themed headers and graphics
- Plan content calendar around shopping seasons
Year-Round Relevance:
- Maintain evergreen lists that perform consistently
- Update seasonal lists regularly
- Create content for lesser-known shopping events
- Balance trending items with reliable favorites
Brand Partnership Integration
Collaboration Opportunities:
- Feature sponsored products in dedicated lists
- Create co-branded content with partner brands
- Offer exclusive discount codes through your storefront
- Develop long-term partnerships with favorite brands
Disclosure and Transparency:
- Clearly mark sponsored content
- Maintain authenticity in all recommendations
- Only partner with brands you genuinely support
- Follow FTC guidelines for influencer marketing
Measuring Success and ROI
Setting Realistic Expectations
Timeline for Results:
- Month 1: Focus on setup and initial content creation
- Month 2-3: Begin seeing consistent traffic and small commissions
- Month 4-6: Establish regular income stream with optimization
- Month 6+: Scale earnings through advanced strategies and partnerships
Revenue Benchmarks:
- Beginner: $50-$500/month
- Intermediate: $500-$2,000/month
- Advanced: $2,000-$10,000+/month
Long-Term Growth Strategies
Content Expansion:
- Regularly add new products and lists
- Create video content for high-performing products
- Develop seasonal and trending content
- Build comprehensive guides in your niche
Audience Development:
- Grow your social media following
- Engage with your community regularly
- Collaborate with other influencers
- Provide consistent value through your recommendations
Your Amazon Storefront Success Action Plan
Creating a successful Amazon influencer storefront isn’t just about the initial setup—it’s about building a valuable resource that serves your audience while generating consistent income for you.
Your Amazon storefront is more than just a collection of product links—it’s your digital real estate on the world’s largest marketplace. When done right, it becomes a powerful asset that generates passive income while you sleep.
The influencers earning $10,000+ monthly didn’t get there by accident. They followed proven systems, avoided common mistakes, and consistently optimized their approach.
Remember, every successful Amazon influencer storefront started with a single product recommendation. The key is to start now, stay consistent, and continuously improve based on what your audience responds to.
Your profitable Amazon storefront journey begins today. Are you ready to build your digital empire?
